
File Submission Specifications
To ensure a perfect print result for your order, we have created detailed guidelines for submitting your files. By following these instructions, we can guarantee the best possible outcome. If you have any questions or need assistance with preparing your files, our team is ready to help. Feel free to contact us!
File Formats
File format type
For the best results during the production of your printed materials, export your design as a PDF file. This format is suitable for all printable products.
For some products, it is also possible to submit a JPG file, but please note that JPG files are often in RGB format. Make sure these files are converted to CMYK to ensure accurate colour reproduction.
Other file formats such as EPS, AI, INDD, PS, PNG, or other formats cannot be accepted.
Colours
CMYK colours
When ordering products with full-colour printing, it is essential to convert your design to CMYK beforehand. If your file still contains PMS or RGB colours when submitted, colour differences may occur despite automatic conversion. To prevent this, we recommend always converting colours manually to CMYK before uploading your file.
CMYK black
For printing deep black areas or large solid shapes, you can use the following CMYK values:
Cyan 50%
Magenta 40% Yellow 40%
Black (K) 100%
This combination creates a rich, deep black tone. For body text or readable text, however, it is important to use only 100% black (K) to keep the text sharp and clear.
For small-format printing
If your design contains white text or lines on a completely black background, please note that with small font sizes or thin fonts, the CMYK build-up of black can affect the white text.
This can result in less sharp text, especially along the edges where other print colours may become visible.
To minimise this effect, you can build the black using 100% black (K) and 40% Cyan.
PMS colours
The Pantone Matching System (PMS) includes more than 1,100 colours, each with a unique code found in the well-known Pantone colour guide. This system ensures that printers worldwide can reproduce the same colour consistently. PMS colours are mainly used for specific shades that must always remain identical, such as for corporate identity printing. Avoid submitting spot colours with personal names such as "Brick Red", "Grass Green", or "Brand Purple", as these cannot be mixed as official PMS colours at our production facility.
Colour differences between materials
The final colour appearance of your design depends on the material you choose. The ink used for digital and offset printing is transparent, meaning the substrate influences the colour result. In addition, the way light reflects from a surface can change how colours are perceived. For example, colours on uncoated materials such as "HVO offset" can differ significantly from colours on coated materials such as "silk coated MC". If your design is used across multiple products, such as for a corporate identity, we recommend using the same material wherever possible to achieve consistent results.
Important to know
- Make sure the ink coverage does not exceed 280%.
- If you use white in your full-colour design, never set it to overprint. Since white is not a printing ink, it will only be visible by being knocked out from the background.
Resolution, Dimensions and Positioning
Resolution
For the best possible print result, it is essential that images have a resolution of at least 300 DPI (dots per inch). This ensures that the print remains sharp and clear, without visible pixelation. A lower resolution, such as 225 DPI, can in many cases still produce a sharp print. However, resolutions of 72 DPI will clearly result in a blurry image, with visible pixels appearing as blocks.
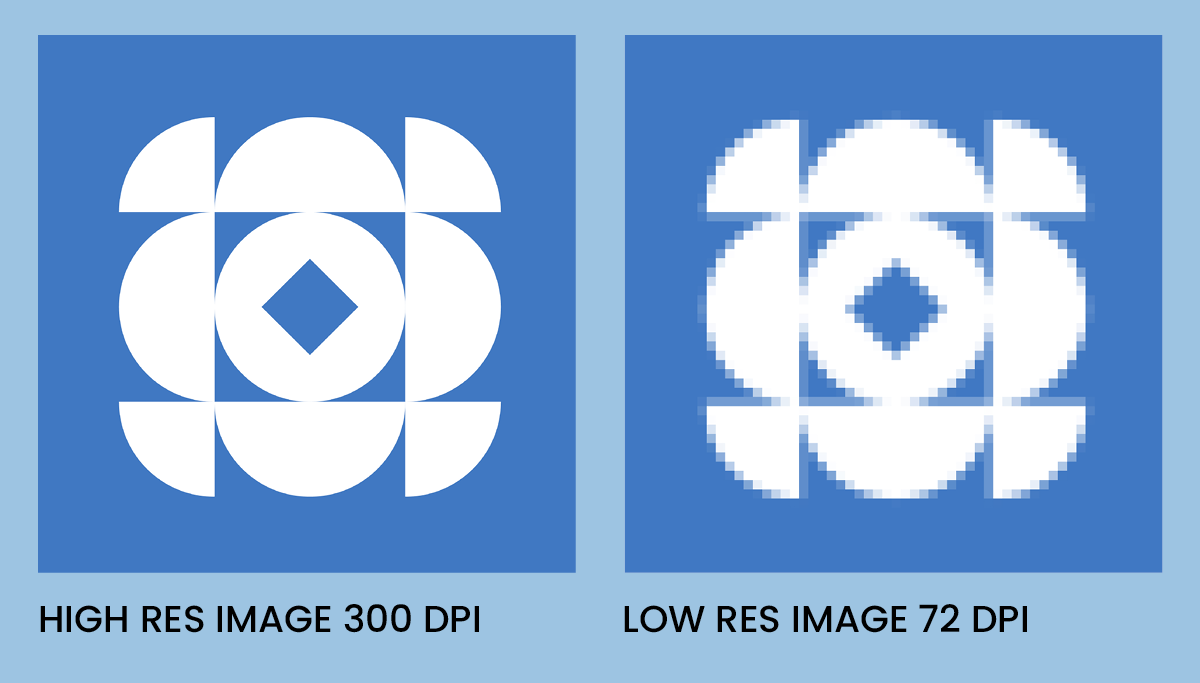
Please be careful when enlarging images: this can reduce the quality, even if the original image had a resolution of 300 DPI, because the pixels are being stretched. For large-format printing, such as banners, a lower resolution of around 150 DPI is often sufficient because these products are usually viewed from a distance.
Avoid increasing the DPI of a low-resolution image, as this does not improve sharpness. It only creates larger file sizes without improving quality. Many images downloaded from the internet have a low resolution of 72 DPI, which is not suitable for professional printing.
Always check the file size in MB, as smaller files (KB) are often not of sufficient quality. For high-quality images, it is important that the resolution matches the size, application, and viewing distance. Images in vector format are resolution-independent because they remain sharp regardless of the size at which they are displayed.
Dimensions
Make sure that your document size exactly matches the area you want to have printed. This is the final size after the product has been cut to the desired format.
It is essential to determine the final dimensions of your printed product before starting your design. Adjusting the size after the design has been created can negatively affect the quality of your images.
Many of our product sizes are displayed during the ordering process, but we also provide templates to help you choose the correct dimensions.
Never use pixels when creating print files.
Always make sure your design has the correct dimensions and do not work in pixels or incorrect units, such as using millimetres when you mean centimetres. Avoiding these mistakes prevents delays and ensures the best possible print quality.
For example, for a banner measuring 3 metres by 1.5 metres, set your file size to 3000 × 1500 millimetres or 300 × 150 centimetres. Accidentally setting the size to 300 × 150 millimetres will result in poor print quality and may cause delays because we will need to request a corrected file.
For vector files, this is not an issue, as they can be scaled without any loss of quality.
Bleed and Margins
Printed materials such as flyers, posters, and business cards are printed on large sheets of paper and then cut to size. Because stacks of paper can shift slightly during cutting, the cutting blade may not always follow the exact cutting line. By adding sufficient bleed, margins, and borders, you ensure that your printed materials always look professional, even after cutting.
Bleed
When printed materials such as business cards or brochures are cut after printing, it is essential to include sufficient bleed (cutting margin) in your design. This prevents unwanted white edges from appearing if the cutting blade does not align perfectly with the intended cutting line. Make sure that bleed areas do not contain text or other important design elements.
The required bleed may vary depending on the product. The specific margin for your product can be found in the file submission specifications on the product page. For most products, the bleed is 3 mm, meaning your file should contain an additional 3 mm of space on all sides, which will be removed after cutting.
Bleed is the extra space around your design that ensures a clean finish, even when small shifts occur during cutting. For example, for a card measuring 105 × 148 mm, the file should be 111 × 154 mm, including bleed.
Always check the product-specific file submission specifications to know which bleed applies to your order.

Safety margin
When submitting a design for printing, it is essential to maintain a safety margin.
This means that important elements such as text, logos, and images should be placed at least 3 mm inside the printable area.
Printing presses can cause small shifts during production. Keeping important elements within the safety margin prevents them from being accidentally cut off.
The required safety margin varies depending on the product.
For business cards it could be 3 mm but for banners it would be closer to 10 mm.
Avoid using very thin borders around your design.
Small shifts during printing can become clearly visible, especially with thin lines. If you choose to use a border, make it as wide as possible to hide possible alignment variations.
It is also important not to place text and images too close to the edge of your design. Always keep at least 3 mm distance from the edge. Important elements such as text and logos should remain at least 5 mm away from the edge. This prevents them from being cut off during finishing.
When uploading your file, you can check whether the safety margin has been applied correctly.

Fonts and Embedding Fonts
Fonts
For small-format printing, almost all standard Adobe fonts can be printed without any issues.
If you use more unusual or exotic fonts, such as symbols, it is important to always convert these to outlines.
This prevents problems during the printing process.
Do you use emoji fonts in your design?
Convert these to images to ensure they are printed correctly. For large formats or promotional products, it is always necessary to convert all used fonts to outlines. This ensures that the text is printed correctly, regardless of whether the font used is available on the printing equipment.
To avoid problems with missing fonts, we recommend converting all text in your file to outlines or ensuring that the fonts are fully embedded in the file.
Images
All images used must be embedded in the file. Make sure there are no links to external images.
File Check
Check spelling and layout
Before submitting your file, carefully check for spelling mistakes and make sure the layout is exactly as intended.
Templates and Tools
Templates
For some products, we provide templates that you can use as a guideline when preparing your file.
Tools
Use professional design software to create your files.
Free tools such as Canva can be useful, but pay attention to the export settings for print quality and to the options for bleed and margins.
File Check
It is important to note that our system automatically performs some basic checks to verify the technical aspects of your files.
Although these checks help identify common errors, they do not provide the same level of detail and accuracy as our paid file checking service.
Our paid file checking service is performed by our experienced team of professionals. They go beyond the standard checks to analyse and verify every aspect of your files, allowing us to identify and resolve potential issues at an early stage.
This additional step ensures that your printing project is handled with the highest level of precision and quality.